Click the image to see full size.
In this tutorial im gona show you how to make the taq you see below.
For this taq i used stock i pulled from the web by searching google.
the stocks i used:
the stocks i used:
I started by making a new document, duh. Then i droped the stock i wand for the base background in there and scaled it to my likings.
Now im gona drop in the second stock, i removed al unwanted parts from it.
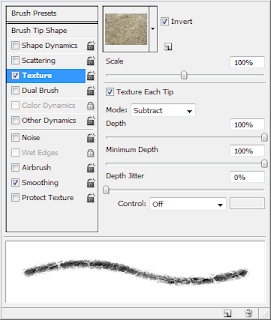
I wand house to look destroyed and the scul comming trough. so what i did i plased house above the scull and scaled it to match the scull. then i used the eraser to remove parts where i want the scul to show. I used a texture on the eraser wich you can apply in the brush menu when you have the eraser selected. i used a texture i made from the stock i used as the base background. with these settings:
After droping in the stock and ersing some parts this is what i got.
Now a duplicated the base layer, draged it above the stck of house, and used the same erasing settings as before. to make it look like the stock is buried in the background.
i removed the parts where i wanted house/skull to show.Next i added a curves layer, just to make it come a little more to life.the curves layer is almost noting, i just altered it a tiny bit.
Next i brushed a little in black on a new layer to ad a little bit of shadow next to the face, and set the layer to a low opacity.
the text im not very good in, so kept it simple, just made a scuare shape, filled it whit a color (offcourse on a new layer) and placed the text above it.
Now to add some flowers, i removed ar backrounds from the stock and just kept the flowers. droped them in and placed them in the taq where i wanted them. Ive added shadows to the flowers in the layer blending options menu.
And this is how it looks after the shadows and flowers.
last ive placed in the spider, and did the same as i did with the flowers.
This tutorial is writen by Johan Schats 2012


Geen opmerkingen:
Een reactie posten